Android开发笔记——以Volley图片加载、缓存、请求及展示为例理解Volley架构设计
Volley是由Google开源的、用于Android平台上的网络通信库。Volley通过优化Android的网络请求流程,形成了以Request-RequestQueue-Response为主线的网络访问链,使得Android网络访问变得简单、高效、扩展性强。(根据RTFSC原则,强烈建议Android的童鞋学习下Volley的架构设计)下面将以ImageLoader、ImageCache、ImageRequest及NetworkImageView为例,对此进行说明。
一、ImageCache-ImageLoader-ImageListener
对于图片的下载,这里采用自底向上的分析方法,即首先明确Volley加载图片是通过ImageLoader的get方法实现的,然后依次说明该方法需要的参数的构成。get方法有三种重载形式(早一些的版本没有第三种):1
2
3public ImageContainer get(String requestUrl, final ImageListener listener);
public ImageContainer get(String requestUrl, ImageListener imageListener, int maxWidth, int maxHeight);
public ImageContainer get(String requestUrl, ImageListener imageListener, int maxWidth, int maxHeight, ScaleType scaleType);
不过前两种都是通过三种方法实现的,这里以第三种方法为例进行说明:1
2
3
4
5
6
7
8
9
10
11
12
13
14
15
16
17
18
19
20
21
22
23
24
25
26
27
28
29
30
31
32
33
34
35
36
37
38
39
40
41
42public ImageContainer get(String requestUrl, ImageListener imageListener,
int maxWidth, int maxHeight, ScaleType scaleType) {
// only fulfill requests that were initiated from the main thread.
throwIfNotOnMainThread();
final String cacheKey = getCacheKey(requestUrl, maxWidth, maxHeight, scaleType);
// Try to look up the request in the cache of remote images.
Bitmap cachedBitmap = mCache.getBitmap(cacheKey);
if (cachedBitmap != null) {
// Return the cached bitmap.
ImageContainer container = new ImageContainer(cachedBitmap, requestUrl, null, null);
imageListener.onResponse(container, true);
return container;
}
// The bitmap did not exist in the cache, fetch it!
ImageContainer imageContainer =
new ImageContainer(null, requestUrl, cacheKey, imageListener);
// Update the caller to let them know that they should use the default bitmap.
imageListener.onResponse(imageContainer, true);
// Check to see if a request is already in-flight.
BatchedImageRequest request = mInFlightRequests.get(cacheKey);
if (request != null) {
// If it is, add this request to the list of listeners.
request.addContainer(imageContainer);
return imageContainer;
}
// The request is not already in flight. Send the new request to the network and
// track it.
Request<Bitmap> newRequest = makeImageRequest(requestUrl, maxWidth, maxHeight, scaleType,
cacheKey);
mRequestQueue.add(newRequest);
mInFlightRequests.put(cacheKey,
new BatchedImageRequest(newRequest, imageContainer));
return imageContainer;
}
上述代码的逻辑非常清晰,可以下面的流程图来表示,不再赘述: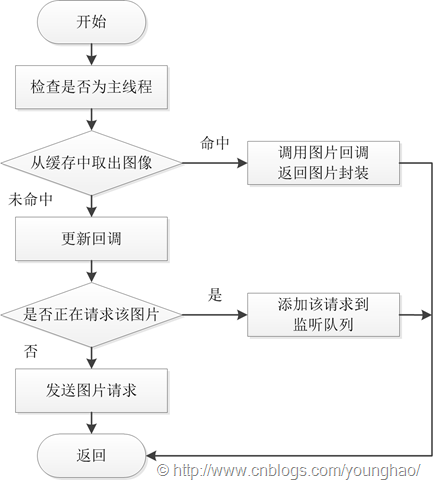
对于StringRequest、JsonRequest,Volley也采用了同样的处理流程。
从get方法的形参入手,这里着重说明ImageListener(其它的形参见名知义)。ImageListener是ImageLoader的内部接口,继承于ErrorListener,需要实现的方法为onResponse:1
2
3
4
5
6
7
8
9
10
11
12
13public interface ImageListener extends ErrorListener {
/**
* Listens for non-error changes to the loading of the image request.
*
* @param response Holds all information pertaining to the request, as well
* as the bitmap (if it is loaded).
* @param isImmediate True if this was called during ImageLoader.get() variants.
* This can be used to differentiate between a cached image loading and a network
* image loading in order to, for example, run an animation to fade in network loaded
* images.
*/
public void onResponse(ImageContainer response, boolean isImmediate);
}
ImageLoader还提供了静态方法getImageListener来获取ImageListener实例:1
2
3
4
5
6
7
8
9
10
11
12
13
14
15
16
17
18
19
20public static ImageListener getImageListener(final ImageView view,
final int defaultImageResId, final int errorImageResId) {
return new ImageListener() {
@Override
public void onErrorResponse(VolleyError error) {
if (errorImageResId != 0) {
view.setImageResource(errorImageResId);
}
}
@Override
public void onResponse(ImageContainer response, boolean isImmediate) {
if (response.getBitmap() != null) {
view.setImageBitmap(response.getBitmap());
} else if (defaultImageResId != 0) {
view.setImageResource(defaultImageResId);
}
}
};
}
从代码很容易看出,ImageListener就是Image请求返回时的回调接口,onErrorResponse和onResponse分别实现了请求失败和成功时加载对应的图片。
分析完get方法执行的流程及形参之后,我们回到ImageLoader本身。ImageLoader的构造函数如下:1
2
3
4
5
6
7
8
9/**
* Constructs a new ImageLoader.
* @param queue The RequestQueue to use for making image requests.
* @param imageCache The cache to use as an L1 cache.
*/
public ImageLoader(RequestQueue queue, ImageCache imageCache) {
mRequestQueue = queue;
mCache = imageCache;
}
同样,从ImageLoader的形参入手,这里需要传入RequestQueue和ImageCache的实例对象。RequestQueue即整个Volley的核心请求队列,在使用Volley时第一个初始化的对象。其构造方法在Volley源码toolbox文件夹下的Volley工具类中:1
2
3
4
5
6
7
8
9
10
11
12
13
14
15
16
17
18
19
20
21
22
23
24
25
26
27
28
29
30
31
32
33
34
35
36
37
38
39
40
41
42
43
44
45
46
47
48
49
50
51public class Volley {
/** Default on-disk cache directory. */
private static final String DEFAULT_CACHE_DIR = "volley";
/**
* Creates a default instance of the worker pool and calls {@link RequestQueue#start()} on it.
*
* @param context A {@link Context} to use for creating the cache dir.
* @param stack An {@link HttpStack} to use for the network, or null for default.
* @return A started {@link RequestQueue} instance.
*/
public static RequestQueue newRequestQueue(Context context, HttpStack stack) {
File cacheDir = new File(context.getCacheDir(), DEFAULT_CACHE_DIR);
String userAgent = "volley/0";
try {
String packageName = context.getPackageName();
PackageInfo info = context.getPackageManager().getPackageInfo(packageName, 0);
userAgent = packageName + "/" + info.versionCode;
} catch (NameNotFoundException e) {
}
if (stack == null) {
if (Build.VERSION.SDK_INT >= 9) {
stack = new HurlStack();
} else {
// Prior to Gingerbread, HttpUrlConnection was unreliable.
// See: http://android-developers.blogspot.com/2011/09/androids-http-clients.html
stack = new HttpClientStack(AndroidHttpClient.newInstance(userAgent));
}
}
Network network = new BasicNetwork(stack);
RequestQueue queue = new RequestQueue(new DiskBasedCache(cacheDir), network);
queue.start();
return queue;
}
/**
* Creates a default instance of the worker pool and calls {@link RequestQueue#start()} on it.
*
* @param context A {@link Context} to use for creating the cache dir.
* @return A started {@link RequestQueue} instance.
*/
public static RequestQueue newRequestQueue(Context context) {
return newRequestQueue(context, null);
}
}
这里重点说明ImageCache,即图片的缓存。ImageCache同样是定义在ImageLoader中的接口(从这里也可以看出volley的高可扩展性):1
2
3
4
5
6
7
8
9/**
* Simple cache adapter interface. If provided to the ImageLoader, it
* will be used as an L1 cache before dispatch to Volley. Implementations
* must not block. Implementation with an LruCache is recommended.
*/
public interface ImageCache {
public Bitmap getBitmap(String url);
public void putBitmap(String url, Bitmap bitmap);
}
根据注释可以看出,推荐使用LruCache。对于LruCache,前面的博文《Android开发笔记——ListView模块、缓存及性能》已做过详细介绍,其通过维护一个强引用来限制内容数量,每当Item被访问的时候,此Item就会移动到队列的头部。当cache已满时加入新的item,在队列尾部的item会被回收。
不过,在某些应用场景下,只使用LruCache还不够。当应用退出后,LruCache清空,重新加载时,缓存的图片依然需要重新加载。这里需要使用DiskLruCache,即磁盘缓存,原理与《Android开发笔记——ListView模块、缓存及性能》中SD卡存储配合LruCache相同,但DiskLruCache实现更为合理,获得Google官方认证。
对于DiskLruCache的源码解析,推荐Android DiskLruCache完全解析,硬盘缓存的最佳方案。
因此,建议配合LruCache和DiskLruCache,以及Volley的请求缓存,形成图片三级缓存。LruCache和DiskLruCache的初始化方法分别如下:1
2
3
4
5
6
7
8int maxSize = (int) (Runtime.getRuntime().maxMemory() / 8);
// 实例化LruCaceh对象
mLruCache = new LruCache<String, Bitmap>(maxSize) {
@Override
protected int sizeOf(String key, Bitmap bitmap) {
return bitmap.getRowBytes() * bitmap.getHeight();
}
};
1 | // 实例化DiskLruCache对象 |
ImageCaches实现getBitmap和putBitmap方法时,可以使用LruCache和DiskLruCache实例高效处理图片。存入缓存时,先存入到LruCache中,然后判断是否存在DiskLruCache缓存,若没有存入;读取图片时,先从LruCache中取,没有时再从DiskLruCache中取(取出之后,顺便存入LruCache中,供下次访问时使用,不再访问DiskLruCache)。1
2
3
4
5
6
7
8
9
10
11
12
13
14
15
16
17
18
19
20
21
22
23
24
25
26
27/**
* 存入缓存(内存缓存,磁盘缓存)
*/
@Override
public void putBitmap(String url, Bitmap bitmap) {
// 存入LruCache缓存
mLruCache.put(url, bitmap);
// 判断是否存在DiskLruCache缓存,若没有存入
String key = MD5Utils.md5(url);
try {
if (mDiskLruCache.get(key) == null) {
DiskLruCache.Editor editor = mDiskLruCache.edit(key);
if (editor != null) {
OutputStream outputStream = editor.newOutputStream(0);
if (bitmap.compress(CompressFormat.JPEG, 100, outputStream)) {
editor.commit();
} else {
editor.abort();
}
}
mDiskLruCache.flush();
}
} catch (IOException e) {
e.printStackTrace();
}
}
1 | /** |
至此,通过volley加载图片的方法已完成。调用方法如下:1
2
3
4
5
6
7
8
9// 获取ImageCache实例
ImageCacheUtil imageCacheUtil = ImageCacheUtil.instance(context);
// 初始化ImageLoader实例
ImageLoader imageLoader = new ImageLoader(requestQueue, imageCacheUtil);
// 获取ImageListener实例
ImageListener listener = ImageLoader.getImageListener(imageRequestBean.getImageView(),
imageRequestBean.getDefaultImageID(), imageRequestBean.getErrorImageID());
// 发送请求图片
imageLoader.get(imageRequestBean.getUrl(), listener,imageRequestBean.getMaxWidth(), imageRequestBean.getMaxHeight());
二、对Volley的架构的理解
如果有童鞋能读到这里,那么对Volley的网络请求处理逻辑应该已经有了一定的认识。下面将通过Volley的官方文档对Volley的架构作进一步的说明。Volley提供了对于网络请求的自动调度,能够处理高并发网络链接,拥有透明的磁盘及内存缓存,支持请求优先级、取消请求、异步网络请求等。Volley的源码地址为:https://android.googlesource.com/platform/frameworks/volley(git clone),不过考虑到网络问题,也可到github上下载:https://github.com/mcxiaoke/android-volley.git(git clone)。
2013年Volley发布会视频:Google I/O 2013 - Volley: Easy, Fast Networking for Android(YouTube,你懂)
2.1 发送一个简单的请求
先贴一张官网的图,后面做解释。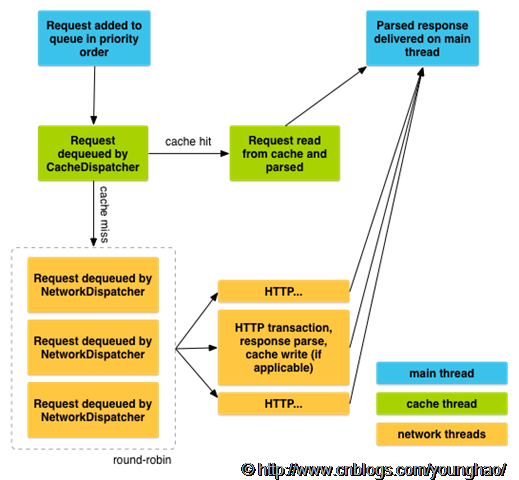
这张图展示了Volley的核心架构,主要包含了以下类:
- Volley。前面已经提到,位于toolbox文件中,是创建请求队列的工具类;
- Request。实现了Comparable
1
public abstract class Request<T> implements Comparable<Request<T>>
1 | /** |
- RequestQueue。Volley的核心,代表整个请求队列。需要重点说明的是其成员变量,包含了
- CacheDispatcher(处理缓存请求的调度线程)
- NetworkDispatcher[](处理网络请求的调用线程组)
- ResponseDelivery(网络请求返回接口分发)
- Network (执行网络请求的网络接口)
- Cache(缓存请求的接口,PS:上一节说的是缓存图片)
- DEFAULT_NETWORK_THREAD_POOL_SIZE(默认线程池数目,至于为什么是4?这是一个经验值,在自己实际应用中,可根据任务、网络状况以及设备等灵活设置)
- PriorityBlockingQueue
- Set
- Map
- AtomicInteger mSequenceGenerator(原子的,避免并发访问)
- RequestFinishedListener
接口(请求完成的回调) 1
2
3
4
5
6
7
8
9
10
11
12
13
14
15
16
17
18
19
20
21
22
23
24
25
26
27
28
29
30
31
32
33
34
35
36
37
38
39
40
41
42
43
44
45
46
47
48
49
50
51
52
53
54
55
56
57/** Callback interface for completed requests. */
public static interface RequestFinishedListener<T> {
/** Called when a request has finished processing. */
public void onRequestFinished(Request<T> request);
}
/** Used for generating monotonically-increasing sequence numbers for requests. */
private AtomicInteger mSequenceGenerator = new AtomicInteger();
/**
* Staging area for requests that already have a duplicate request in flight.
*
* <ul>
* <li>containsKey(cacheKey) indicates that there is a request in flight for the given cache
* key.</li>
* <li>get(cacheKey) returns waiting requests for the given cache key. The in flight request
* is <em>not</em> contained in that list. Is null if no requests are staged.</li>
* </ul>
*/
private final Map<String, Queue<Request<?>>> mWaitingRequests =
new HashMap<String, Queue<Request<?>>>();
/**
* The set of all requests currently being processed by this RequestQueue. A Request
* will be in this set if it is waiting in any queue or currently being processed by
* any dispatcher.
*/
private final Set<Request<?>> mCurrentRequests = new HashSet<Request<?>>();
/** The cache triage queue. */
private final PriorityBlockingQueue<Request<?>> mCacheQueue =
new PriorityBlockingQueue<Request<?>>();
/** The queue of requests that are actually going out to the network. */
private final PriorityBlockingQueue<Request<?>> mNetworkQueue =
new PriorityBlockingQueue<Request<?>>();
/** Number of network request dispatcher threads to start. */
private static final int DEFAULT_NETWORK_THREAD_POOL_SIZE = 4;
/** Cache interface for retrieving and storing responses. */
private final Cache mCache;
/** Network interface for performing requests. */
private final Network mNetwork;
/** Response delivery mechanism. */
private final ResponseDelivery mDelivery;
/** The network dispatchers. */
private NetworkDispatcher[] mDispatchers;
/** The cache dispatcher. */
private CacheDispatcher mCacheDispatcher;
private List<RequestFinishedListener> mFinishedListeners =
new ArrayList<RequestFinishedListener>();
发送一个请求,只需将请求添加到请求队列即可。官网的一段示例代码如下:1
2
3
4
5
6
7
8
9
10
11
12
13
14
15
16
17
18
19
20
21
22
23final TextView mTextView = (TextView) findViewById(R.id.text);
...
// Instantiate the RequestQueue.
RequestQueue queue = Volley.newRequestQueue(this);
String url ="http://www.google.com";
// Request a string response from the provided URL.
StringRequest stringRequest = new StringRequest(Request.Method.GET, url,
new Response.Listener<String>() {
@Override
public void onResponse(String response) {
// Display the first 500 characters of the response string.
mTextView.setText("Response is: "+ response.substring(0,500));
}
}, new Response.ErrorListener() {
@Override
public void onErrorResponse(VolleyError error) {
mTextView.setText("That didn't work!");
}
});
// Add the request to the RequestQueue.
queue.add(stringRequest);
取消请求同样简单,通过TAG来找到特定的request,然后取消。1
2
3
4
5
6
7
8
9public static final String TAG = "MyTag";
StringRequest stringRequest; // Assume this exists.
RequestQueue mRequestQueue; // Assume this exists.
// Set the tag on the request.
stringRequest.setTag(TAG);
// Add the request to the RequestQueue.
mRequestQueue.add(stringRequest);
1 | @Override |
2.2 创建一个RequestQueue
在2.1节中,使用了默认的RequestQueue构造器(即通过Volley工具类),但Volley支持自定义NetWork和Cache,实现更加个性化的网络和缓存。另外一个需要注意的问题就是单例模式,为了高效的使用RequestQueue,官方建议在整个应用的生命周期内只使用一个RequestQueue实例。不过注意到很多中文的帖子使用继承Application,在Application的onCreate()方法中创建RequestQueue,官方并不鼓励这种做法,使用静态的的单例能够以更加模块化的方式实现同样的功能。核心的思想是RequestQueue应该被Application的context实例,而不是某个Activity的context。(getApplicationContext()与getContext()方法的区别)
2.3 创建一个标准的请求
继承Request的请求类型主要有:StringRequest、ImageRequest、JsonObjectRequest和JsonArrayRequest(JsonRequest的子类),第一节对ImageRequest进行了详细的说明,这里主要说明JsonObjectRequest和JsonArrayRequest,因为在实际项目中,通Json传递数据可能是目前最常见的方式。1
2
3
4
5
6
7
8
9
10
11
12
13
14
15
16
17
18
19
20
21
22
23TextView mTxtDisplay;
ImageView mImageView;
mTxtDisplay = (TextView) findViewById(R.id.txtDisplay);
String url = "http://my-json-feed";
JsonObjectRequest jsObjRequest = new JsonObjectRequest
(Request.Method.GET, url, null, new Response.Listener<JSONObject>() {
@Override
public void onResponse(JSONObject response) {
mTxtDisplay.setText("Response: " + response.toString());
}
}, new Response.ErrorListener() {
@Override
public void onErrorResponse(VolleyError error) {
// TODO Auto-generated method stub
}
});
// Access the RequestQueue through your singleton class.
MySingleton.getInstance(this).addToRequestQueue(jsObjRequest);
官方的示例代码比较简单。不过可以关注下Request的方法,它抽象了StringRequest、ImageRequest、JsonRequest的公共特征,这种结构设计的思路值得学习。
最后推荐几个博客作为参考:
Volley 源码解析
Android库Volley的使用介绍
Android Volley完全解析(四),带你从源码的角度理解Volley(Volley系列文章)